
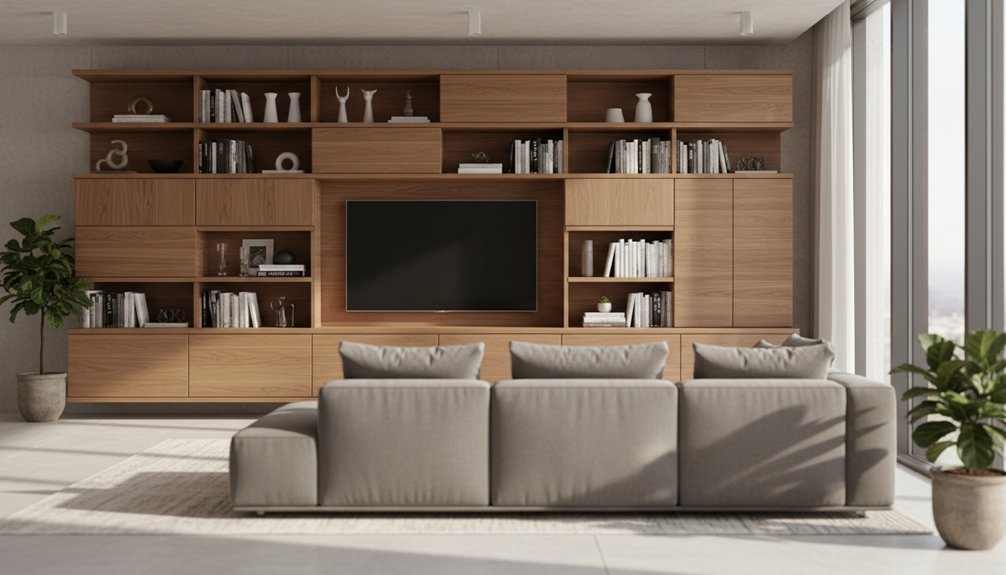
To optimize your media unit setup, extend the unit 8-12 inches beyond each side of your TV. Position the media unit against the longest wall to enable viewing from a distance of 8-10 feet. Choose either wall-mounted units that conserve floor space or freestanding units that provide greater storage options. Select materials based on your needs: solid wood offers durability, while engineered wood provides a cost-effective solution. Ensure that shelves accommodate the depth of your equipment, allowing for 2-4 inches of ventilation clearance to prevent overheating.
Next, let’s discuss the best placement strategies for your media unit. Start by measuring your living room layout to identify the longest wall and the optimal viewing distance. This helps you avoid cramped spaces and ensures everyone can enjoy the screen comfortably.
Once you’ve determined the placement, coordinate the media unit’s style with existing furniture. Match colors and finishes to create a cohesive look in your entertainment area. This will enhance the overall aesthetic while ensuring that your media unit blends seamlessly with your décor.
Finally, review the technical specifications to ensure your media unit meets your needs. Verify that it supports the weight of your TV and any additional equipment. Double-check the dimensions of your media unit to confirm it fits within the designated space. Keep in mind that choosing the right media unit enhances both functionality and style in your living room.
Choosing Media Unit Size for Your TV and Room Dimensions
To choose the right media unit size, focus on three essential measurements: the width of your TV, the dimensions of your room, and the distance between your seating and the TV. Your media unit should extend between 8 to 12 inches beyond each side of the TV for visual balance.
Choose a media unit 8-12 inches wider than your TV on each side for proper visual balance and proportion.
For example, if you have a 55-inch TV, select a media unit that measures approximately 65 to 75 inches wide.
Consider your room’s proportions when determining the depth and height of the media unit. In smaller spaces, opt for units that are under 18 inches deep to ensure adequate walkway clearance.
In larger rooms, you can choose deeper units that offer more storage space.
Align the media unit dimensions with your seating arrangement. Ideally, viewers should sit 1.5 to 2.5 times the diagonal screen size of the TV away.
For a 55-inch TV, this translates to a viewing distance of approximately 6.5 to 11.5 feet.
Before you start shopping, measure your available wall space to ensure the media unit fits without overwhelming or underwhelming the room. Additionally, maintaining at least 30 inches of clearance around the media unit will enhance movement and accessibility in your living room.
This approach will help you create a cohesive and functional entertainment area.
Wall-Mounted vs. Freestanding Media Units: Which Layout Works Best?
Deciding between a wall-mounted media unit and a freestanding media unit requires assessing your space and lifestyle needs. Wall-mounted units maximize floor space and offer a modern look, while freestanding units provide flexibility and easier repositioning without needing tools.
| Feature | Wall-Mounted | Freestanding |
|---|---|---|
| Floor Space | Saves space | Uses floor area |
| Installation | Requires installation skills | Simple placement |
| Flexibility | Fixed location | Easy to relocate |
| Storage | Limited storage options | More compartments |
Wall-mounted units benefit smaller rooms where every square foot counts. They clear the floor for easier cleaning and create an open atmosphere. In contrast, freestanding units provide ample storage for media equipment, gaming consoles, and decorative items. You can easily move freestanding units around when rearranging your furniture. Additionally, solid wood furniture can be a stylish and durable choice for either type of media unit.
Consider your room size, storage requirements, and whether you want a permanent fixture or a unit that can adapt to changing layouts. Each option has its advantages, so analyze your specific needs to choose the layout that works best for you.
Media Unit Placement: Living Room Layout Ideas That Work
Choose the right placement for your media unit to enhance your living room layout. Position your media unit against the longest wall to optimize viewing angles and improve functionality.
Place seating at least 8-10 feet from the screen to ensure comfortable viewing distances. If your room is small, consider a corner placement, but be aware that this may limit your seating options.
Avoid positioning your media unit near windows or directly opposite them to prevent glare that impacts screen visibility. Central wall placement typically offers the best aesthetics for your media unit and facilitates a symmetrical furniture arrangement.
Always measure your space before deciding on a location. Consider doorways, traffic flow, and electrical outlets to finalize your placement effectively. Additionally, incorporating minimalist design principles can enhance both the functionality and aesthetics of your media unit setup.
Wood, Metal, or Glass Media Units: Comparing Durability and Care
Material selection impacts the durability and maintenance of your media unit. Understanding the characteristics of each material helps you make an informed choice for your living space.
| Material | Durability | Maintenance Needs |
|---|---|---|
| Wood | Wood has high resistance to impacts; quality hardwoods increase durability. | Regular dusting is necessary; polish with wood-specific products occasionally. |
| Metal | Metal offers excellent strength; it resists warping and structural damage effectively. | Clean with a damp cloth; prevent rust in humid environments. |
| Glass | Glass has moderate durability; tempered glass withstands normal use but can chip if struck. | Frequent cleaning is required; use a streak-free glass cleaner. |
| Mixed Materials | Mixed materials vary in durability based on the combination; they typically maintain good durability. | Follow care instructions specific to each component. |
| Engineered Wood | Engineered wood serves budget-conscious buyers; its durability is less than that of solid wood. | Avoid excessive moisture and dust regularly. |
Wood provides a timeless aesthetic, metal offers an industrial look, and glass contributes to a modern, minimalist style. Each material has unique care requirements, so consider your lifestyle and environment when making a selection.
Minimalist and Contemporary Media Unit Styles
When selecting a media unit for your living room, focus on materials and design styles that enhance your space. Minimalist designs emphasize clean lines and simple forms. These designs reduce visual clutter and promote a sense of calm.
Contemporary styles incorporate current trends while ensuring functionality. Both styles work well in various settings, especially smaller spaces.
Consider these key features when choosing your media unit:
Evaluate sleek profiles, neutral tones, and versatile storage options to find the perfect media unit for your space.
- Sleek profiles provide hidden storage compartments. These compartments keep cables and accessories out of sight, creating a tidy appearance.
- Neutral color palettes such as white, black, gray, or natural wood tones integrate seamlessly into different decor styles. These colors maintain a cohesive look in your living room.
- Open shelving paired with closed cabinets allows you to display selected items while concealing everyday electronics. This mix adds visual interest without overwhelming the space.
These design choices help create a balanced and functional environment. Focus on selecting a media unit that offers adequate storage without compromising your living room’s overall aesthetic.
Pairing Media Units With Coffee Tables and Storage Furniture
When you pair your media unit with coffee tables and storage furniture, you enhance both the functionality and aesthetics of your living room.
Ensure that your coffee table’s height aligns with your seating and media unit for optimal usability. Low-profile coffee tables complement wall-mounted units well, while standard-height coffee tables work best with traditional media consoles.
Select materials and finishes that match across all pieces to create a cohesive look. For instance, a wooden media unit pairs seamlessly with a wooden coffee table. In contrast, glass and metal combinations can modernize the space.
Integrate storage furniture, such as bookcases or cabinets, near your media unit to minimize clutter and maintain an organized environment. Position storage furniture thoughtfully to maintain clear pathways and ensure good viewing angles.
Choose coffee table styles that resonate with your media unit’s design. Contemporary media units pair best with sleek, modern coffee tables, while rustic media consoles look great alongside traditional, rustic coffee tables.
Shelf Depth, Weight Capacity, and Ventilation Needs by Screen Size
When selecting a media unit for your TV, focus on three key factors: shelf depth, weight capacity, and ventilation needs. The shelf depth must be sufficient to support your TV’s base securely. The media unit’s weight capacity should exceed your TV’s actual weight to ensure stability and safety. Additionally, proper ventilation space is necessary to prevent overheating of your equipment. These requirements differ based on your TV’s screen size.
For example, a 55-inch TV typically has a base that requires a shelf depth of at least 12 inches. If your TV weighs 60 pounds, choose a media unit with a weight capacity of at least 75 pounds for added safety. Ensure the unit allows for at least 4-6 inches of clearance around the TV for adequate airflow.
When considering a larger TV, like a 75-inch model, the shelf depth may need to increase to 14 inches, and the weight capacity should be at least 100 pounds, depending on the TV’s weight. Always verify the manufacturer’s specifications for your specific TV model to avoid any issues.
Optimal Shelf Depth Guidelines
Proper shelf depth is essential for designing media units that protect your equipment and ensure good airflow. Homeowners often overlook this aspect, which can lead to damage and overheating. You must select shelf dimensions that match your specific components while providing adequate space for ventilation.
Standard shelf depths range from 16 to 20 inches, but you may need to adjust these measurements based on your setup.
Soundbars and Center Channels
Soundbars and center channels require a minimum shelf depth of 6-8 inches. You should also include at least 2 inches of clearance behind these devices to facilitate airflow and avoid overheating.
Gaming Consoles
Gaming consoles need a shelf depth of 14-16 inches. This space accommodates necessary cables and promotes effective heat dissipation during use.
AV Receivers
AV receivers need more space, requiring a shelf depth of 18-20 inches. This depth allows for proper heat dissipation, which is critical for the long-term performance of these devices.
Materials and Thickness
Use reinforced wood composites or solid hardwood for your shelves. These materials can support the weight of your equipment without sagging. Ensure that your shelves are at least ¾ inch thick to maintain structural integrity over time.
Weight Load Specifications
Three key factors determine whether your media unit shelves will safely support your television and equipment. First, assess the screen size of your TV. Second, evaluate the total weight distribution across the shelf. Third, consider the ventilation requirements for your setup.
You must verify if the shelf material can handle the weight of your TV and additional components, such as receivers and gaming consoles. For example, most 55-inch TVs weigh between 30 to 50 pounds, while 65-inch models typically weigh between 50 to 70 pounds.
To ensure stability, distribute the weight evenly across the shelf to prevent sagging or potential collapse.
When selecting materials, solid wood and reinforced MDF provide superior strength compared to particle board. Always check the manufacturer’s specifications for the maximum load capacity, which usually ranges from 50 to 150 pounds based on the shelf’s construction.
It’s essential to leave a 20-pound safety margin below the stated maximum capacity to account for any unforeseen issues.
Proper Airflow Clearance Requirements
Electronics produce heat during operation. To prevent overheating and extend the lifespan of your TV and media components, provide adequate airflow clearance around each unit. Proper ventilation ensures that your equipment functions reliably over time.
Follow these airflow clearance guidelines for maximum ventilation:
- Maintain 2-4 inches of space on all sides of your media console and between stacked components. This space allows heat to dissipate effectively and prevents components from overheating.
- Use open-back shelving or include built-in ventilation holes in enclosed cabinets. This design maintains consistent air circulation around gaming consoles and receivers, which is crucial for their performance.
- Install wall-hung TVs at least 2 inches away from the wall surface. This distance prevents heat buildup behind the screen and promotes better airflow.
Inadequate spacing forces components to work harder, which increases energy consumption and reduces their operational lifespan.
Always prioritize proper airflow clearance to ensure your electronics operate efficiently and last longer.
How to Hide TV Cables and Keep Your Media Unit Organized
Tangled cables and disorganized media units can detract from your living room’s overall look. To manage cables effectively, start by routing wires through built-in channels or securing adhesive cable clips along the back panel of your media unit.
Bundle similar cables together using Velcro ties for easy adjustments. Label each cord with tags to quickly identify connections during setup changes.
To keep your media accessories organized, use drawer dividers to separate remotes, gaming controllers, and other gadgets. Install a power strip inside your media unit to maintain accessibility while keeping outlets hidden.
Additionally, consider adding a cord cover that runs down the wall behind your TV. These practical solutions help you maintain a clean and functional appearance, ensuring everything is easy to access when needed.