

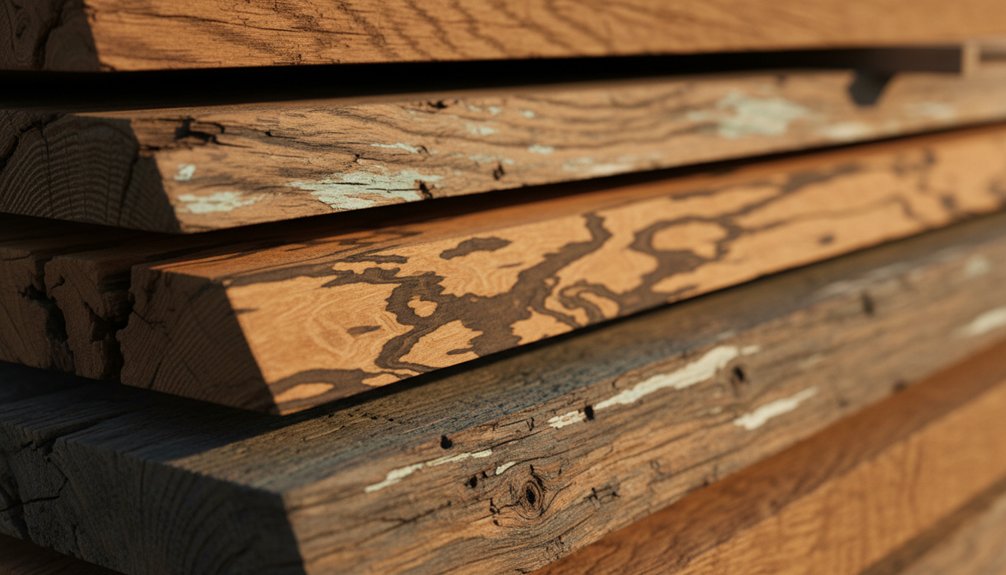
Rustic furniture focuses on highlighting wood’s natural features. Craftsmen utilize rough-sawn or skip-planed lumber to showcase knots, cracks, and irregular grain patterns. Many builders source reclaimed wood from barns, demolition sites, and salvage yards to maintain authenticity.
To finish rustic furniture, I apply light oils or waxes to enhance the wood’s natural tones without masking unique characteristics. Techniques like wire brushing, charring, and gouging add to the aged appearance, making each piece distinct. The choice of finish and technique depends on the intended use of the furniture and the desired visual impact.
When working with rustic materials, I avoid polished or overly refined finishes, as they detract from the wood’s inherent beauty. Instead, I focus on methods that preserve the rustic aesthetic, ensuring that each piece retains its original character. Understanding the limitations of different woods and finishes is crucial for achieving the best results in rustic furniture construction.
What Makes Wood “Rustic” vs. Refined or Modern?
The character of wood directly influences the appearance of furniture, determining whether it looks rustic, refined, or modern.
Rustic furniture features natural imperfections like knots, cracks, and irregular grain patterns. These characteristics highlight the wood’s raw beauty and lend authenticity to rustic designs. In contrast, refined furniture uses carefully selected wood that has minimal flaws and a consistent grain.
Modern furniture stands out through smooth surfaces, straight lines, and uniform coloring. For example, rustic wood often retains its bark edges and weathered textures, which add to its character. You might find checks, burls, or mineral streaks in rustic pieces that manufacturers typically remove from refined items.
The finishing process also varies significantly. Rustic furniture receives lighter treatment to maintain its natural characteristics, while modern styles undergo extensive sanding and processing for a sleek finish.
This difference in wood selection and finishing techniques creates distinct visual identities for rustic, refined, and modern furniture styles. Understanding these differences helps craftsmen choose the right materials and methods for their projects, including the unique grain patterns that contribute to the overall aesthetic appeal of solid wood furniture.
Rough-Sawn and Skip-Planed Lumber for Texture
Rough-sawn lumber features deep grooves and an uneven surface from the sawmill blade, which gives it a rustic character. This texture is a result of the cutting process, and it retains the natural marks that reflect the wood’s journey.
Skip-planing follows this by shaving off just the high points of the rough surface. This technique maintains the valleys and texture between the high points, allowing for a balance between smoothness and ruggedness.
By adjusting the skip-plane depth, you can control how much texture remains on the lumber. For example, a lighter skip-plane will preserve more of the original roughness, while a deeper cut will yield a smoother finish. This versatility is essential for furniture makers who want their pieces to feel approachable and comfortable while still showcasing a handcrafted appearance.
Rough-sawn lumber works well in rustic designs, but it has limitations. It may not be suitable for fine furniture or spaces that require a polished look. Understanding these constraints helps woodworkers decide when to use rough-sawn and skip-planed lumber effectively. Additionally, ensuring proper furniture sizing is crucial to achieving a functional and aesthetically pleasing space.
In practice, using these techniques allows artisans to create unique pieces that highlight the wood’s natural beauty and craftsmanship.
Defining Rough-Sawn Surfaces
Rough-sawn surfaces define the rustic style of furniture, setting them apart from polished alternatives. When I work with rough-sawn lumber, I focus on the unique textures created during the initial sawmill cutting process. The key features of rough-sawn wood include visible blade marks, uneven grain exposure, and dimensional variations that enhance its appeal for rustic projects.
The sawmill cutting process produces several distinct characteristics:
- Circular saw blades create parallel ridges across the board’s width.
- Irregular cutting depths expose natural color variations in the wood.
- Dramatic grain patterns emerge, appearing more pronounced than those found in planed surfaces.
- Tactile differences develop, providing a distinct feel when running your hand over the wood.
Recognizing these features helps explain the popularity of rough-sawn lumber in rustic furniture making. The unrefined surfaces showcase the natural character of wood and contribute authentic visual interest to each piece.
Understanding the manufacturing process and these specific attributes allows craftsmen to appreciate and utilize rough-sawn lumber effectively in their projects.
Skip-Planing Technique Benefits
Skip-planing offers a practical solution for achieving a balance between rough-sawn lumber’s rustic look and the smoothness needed for functional furniture. This technique removes high spots from the wood while keeping the natural texture in the valleys and saw marks. By running the boards through a planer set to shave off only these high points, you create flat surfaces that are usable without losing the rustic appeal.
Skip-planed wood enhances structural stability and reduces the risk of splintering. This process makes furniture more comfortable to touch and easier to finish. You can apply stains and protective coatings more evenly on skip-planed surfaces compared to fully rough-sawn lumber.
Skip-planing allows you to maintain the weathered aesthetic that’s characteristic of rustic furniture design while ensuring that the pieces are practical and functional for everyday use. The technique strikes a balance, making it an effective choice for those who value both form and function in woodworking projects.
Achieving Desired Texture Depth
When working with rough-sawn or skip-planed lumber, controlling texture depth is essential for achieving the desired rustic or refined look in your furniture. Assess the wood surface before applying any finish. This assessment helps you determine how to enhance the texture effectively. The amount of material removed during planing will significantly influence the final character of your piece.
To ensure you achieve the best results, follow these steps:
- Test your planer settings on scrap lumber to preview the texture depth. This step allows you to fine-tune your approach before working on the actual piece.
- Make multiple light passes with the planer instead of one deep cut. This method provides better control over texture depth and reduces the risk of over-planing.
- Sand only the high points of the wood surface if your goal is to preserve deeper texture. This technique maintains the character of the wood while smoothing out imperfections.
- Use finish layering techniques to emphasize the wood’s natural contours. Applying multiple thin layers of finish enhances depth and showcases the wood’s unique features.
Following these steps will give you complete control over your furniture’s final appearance and tactile experience.
Sourcing Reclaimed and Salvaged Wood
Finding quality reclaimed wood involves knowing where to search and what specific details to inquire about. You can locate reclaimed sources at demolition sites, old barns, abandoned warehouses, and salvage yards.
Architectural salvage companies offer vintage lumber from historic buildings. Contact local contractors, as they often discard usable wood during renovations.
When evaluating reclaimed wood, prioritize structural integrity and check for hidden metal fasteners. Inspect each piece closely for signs of rot, insect damage, or excessive warping.
Assess whether the wood needs additional treatment or if its natural aged appearance meets your project’s requirements.
Salvaging techniques focus on careful extraction to maintain the wood’s character and usability. Systematically remove nails and screws to prevent grain damage.
Clean surfaces gently to preserve authentic weathering and patina. Always conduct a thorough inspection to ensure the material is suitable for your intended application. Understanding the importance of structural integrity ensures that reclaimed wood can be effectively utilized in rustic furniture designs.
Preparing Weathered Wood Surfaces for Finishing
Preparing weathered wood for finishing requires careful attention to detail and methodical steps. Accumulated dirt, grime, and surface contaminants can hinder the application of finishes, so thorough cleaning is essential. The goal is to ensure that the finish adheres properly and enhances the wood’s natural character.
Clean the Weathered Wood Surface
To prepare weathered wood, start by removing loose debris. Use a stiff wire brush or a pressure washer set to low pressure to effectively dislodge dirt and grime from the surface.
Begin weathered wood preparation by using a wire brush or low-pressure washer to remove loose debris and surface contaminants.
This initial cleaning step sets the stage for more detailed preparation.
Smooth the Surface
Next, sand any rough areas of the wood with 80-grit sandpaper. This action smooths out splinters and rough patches while still preserving the wood’s aged patina.
Sanding is crucial, as it creates a clean surface for the finish to adhere to.
Wash the Wood
After sanding, clean the wood with a mild detergent mixed with water. This step removes any remaining dust and residue from the sanding process.
Rinse the surface thoroughly with clean water to ensure no detergent remains, which could interfere with the finish application.
Allow the Wood to Dry
Following the washing, allow the wood to dry completely in a well-ventilated area. Aim for a drying time of at least 48 hours.
This ensures that the wood is moisture-free before applying any finish, which is critical for a successful outcome.
Test the Finish
Once the surface preparation is complete, test your chosen finish on a small, inconspicuous area of the wood.
This practice confirms that the finish is compatible with the wood and allows you to see how it will look before applying it to the entire piece.
Highlighting Knots, Burls, and Grain Character
Natural wood features such as knots, burls, and unique grain patterns define the character of rustic furniture. You should emphasize these features in your finishing process.
Apply clear finishes or light stains that let the knot patterns stand out. Dark knots provide a bold contrast against lighter wood tones, enhancing visual interest.
For burls, use thin coats of oil-based finishes. These finishes penetrate deeply and highlight the swirling grain formations that make each burl distinctive.
To enhance dramatic grain, apply gel stains selectively. Wipe the stains along the wood’s natural lines to accentuate the grain’s beauty.
Use tung oil or Danish oil for a low-sheen finish. These oils maintain the wood’s natural texture without obscuring its features.
Sand lightly between coats with 220-grit sandpaper. This process keeps the surface smooth while preserving the wood’s character features.
Avoid heavy finishes, as they can mask the unique details of the wood.
Always prioritize the natural beauty of knots, burls, and grain patterns in your rustic furniture projects.
Applying Oil Finishes to Deepen Natural Tones
Oil finishes enhance the natural tones of wood while providing protection. When applying an oil finish, choose the right type based on your project needs. Tung oil offers durability, linseed oil is cost-effective, and Danish oil simplifies the application process.
To apply the oil finish, prepare the wood surface by sanding it smooth. Use a clean cloth to apply the oil in a thin, even layer, allowing it to penetrate for about 15 to 30 minutes. Wipe off any excess oil to prevent a sticky surface.
After the first coat dries—typically within 24 hours—assess the finish. For deeper color and protection, apply additional coats as necessary.
Limitations include the drying time and potential for uneven absorption in different wood species. Always test the oil on a small, inconspicuous area first to ensure the desired effect.
Following these steps guarantees a rich, hand-rubbed finish that highlights the wood’s natural beauty while keeping it protected.
Choosing the Right Oil
When you’re ready to enhance the appearance of your rustic furniture, choosing the right oil finish is crucial for showcasing the wood’s natural beauty. Different oil types offer specific benefits and produce different results, so it’s important to consider each option carefully.
- Tung oil provides water resistance and forms a durable, hand-rubbed finish. This oil moderately darkens the wood, making it ideal for projects where you want a rich, deep tone.
- Linseed oil penetrates deeply into the wood grain, providing traditional protection. However, it has extended drying times, which may require more patience during your finishing process.
- Danish oil combines varnish with oil, allowing for a quicker application while still offering reliable surface protection. This option is great if you’re looking for efficiency without compromising on quality.
- Teak oil works exceptionally well on dense hardwoods, enhancing and deepening the wood’s rich color tones, making it suitable for outdoor furniture.
Select your oil based on the type of wood and the finish you want to achieve.
Always test your chosen application method on scrap pieces of the same wood first. This step helps ensure that you’ll achieve the depth and character you envision before applying it to your main project.
Application Techniques and Tips
Once you select the right oil for your rustic furniture, applying it correctly is crucial for achieving a rich, deep finish.
Start with sanding the wood surface using 220-grit sandpaper. This step opens the wood grain for better oil absorption.
After sanding, apply the oil with a clean cloth or brush. Work with the wood grain using long, even strokes to ensure uniform coverage and avoid streaks. Allow the oil to penetrate the wood for 10 to 15 minutes. Then, use a lint-free cloth to wipe off any excess oil.
Instead of applying one thick coat, use multiple thin coats. This method builds depth gradually and enhances the wood’s natural character.
Wait 24 hours between coats to ensure proper drying. Generally, three coats provide the ideal results and protection for your furniture.
This approach guarantees a professional finish that highlights the beauty of the wood.
Using Wax for Low-Sheen Protection
If you’re looking for a finish that protects rustic furniture while maintaining a low sheen, using wax is a reliable choice. Wax enhances the natural beauty of wood and offers decent resistance against moisture and minor wear.
To apply wax effectively, use either paste or liquid wax and rub it onto bare or sealed wood with a lint-free cloth in circular motions.
To achieve optimal results with low-sheen wax, follow these specific steps:
- Apply thin, even coats instead of thick layers to ensure proper adhesion.
- Wait 20-30 minutes between each coat to allow the wax to dry effectively.
- Buff the surface with a clean cloth to achieve the desired level of luster.
- Reapply the wax every few months to maintain protection and appearance.
This straightforward method results in a hand-rubbed finish that complements rustic designs.
Keep in mind that over-waxing can create a build-up, so stick to thin layers. Using wax requires regular maintenance, but the authentic look it provides is worth the effort.
Wire Brushing, Gouging, and Charring Techniques
Rustic furniture benefits from texture-enhancing techniques that create character and visual interest. Wire brushing involves scraping metal bristles across wood grain to remove soft fibers while leaving the harder growth rings raised. This process creates a dimensional surface that highlights natural wood patterns, making each piece unique.
Gouging uses chisels or specialized tools to create deliberate dents, scratches, and worn areas, simulating the appearance of age and use. These markings provide an authentic weathered look that enhances the rustic appeal of furniture.
Charring, also known as shou sugi ban, entails burning wood surfaces with a torch to achieve dark, textured finishes. You control the depth of the burn by adjusting the flame intensity and duration. After charring, you wire brush the surface to remove loose char, revealing dramatic grain patterns underneath.
Combining wire brushing, gouging, and charring transforms plain lumber into distinctive rustic furniture pieces that stand out in any setting.
When applying these techniques, consider the type of wood you’re using, as softer woods may respond differently than harder varieties. Always wear safety gear, such as goggles and gloves, when performing these techniques, especially when using tools or torches.
The result is a sturdy, visually appealing piece that tells a story through its crafted surface.
Adjusting Finish Intensity for Different Projects
The finish you apply to your rustic furniture directly affects its appearance and durability. Adjust your finish intensity based on the specific project requirements. For example, a dining table needs a tougher finish compared to a piece of wall art.
Consider these factors when adjusting finish intensity:
- Functional Use: High-traffic furniture, like dining tables, requires a durable finish to withstand regular use. In contrast, decorative items, like wall art, can use lighter finishes since they experience less wear.
- Visual Impact: Subtle distressing enhances the elegance of formal furniture. For casual pieces, more aggressive distressing techniques create a relaxed, lived-in look.
- Wood Species: Softer woods, such as pine, display texture more prominently than denser hardwoods, like oak. Adjust your techniques accordingly to highlight the wood’s characteristics.
- Client Preferences: Always align your finishing techniques with the client’s style and expectations. A client’s desire for a rustic feel may dictate a heavier distressing approach.
Start with conservative applications of finish and distressing techniques. You can always add more finish or distressing later, but removing excess finish is challenging.
Focus on achieving the right intensity from the beginning to meet the project’s needs.